
📑 Table of Contents
- Introduction
- 1 — General Purpose Concrete Mix (1:2:3)
- 2 — High Strength Concrete Mix (1:1.5:3)
- 3 — Mortar Mix (1:3)
- 4 — Stucco Mix (1:3 with Lime)
- 5 — Concrete for Cold Weather (1:2:3 with Accelerator)
- 6 — Fast Setting Concrete (1:2:3 with Rapid Set Cement)
- Why Ratios Matter
- Measuring Tips
- Common Cement Mixer Mixing Mistakes
- Final Thoughts
- Our Business Partner
Compact cement mixer mixing ratios guide solves a common problem. Most operators guess at ratios. They dump in cement. They add sand. They splash in water. The result is weak concrete. It cracks. It crumbles. It fails. All because the ratios were wrong.
Concrete is not forgiving. The mix needs the right proportions. Too much water weakens it. Too little makes it unworkable. Too much sand makes it brittle. Too little cement makes it weak. Every ingredient matters. Every ratio matters.
The good news is that Cement Mixer Mixing ratios are simple. Six standard recipes cover most jobs. Each one is easy to follow. Each one delivers strong, durable concrete. The guide below explains each recipe. It covers when to use it. It covers how to mix it. Follow these Cement Mixer Mixing ratios. Get perfect concrete every time.
1 — General Purpose Concrete Mix (1:2:3)
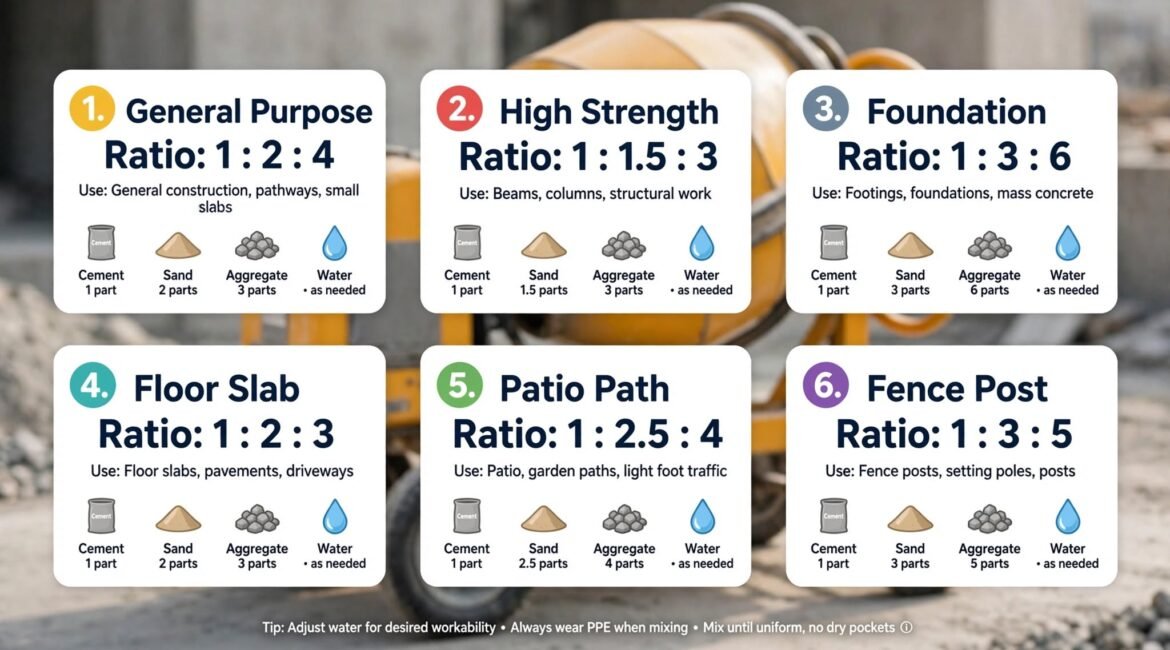
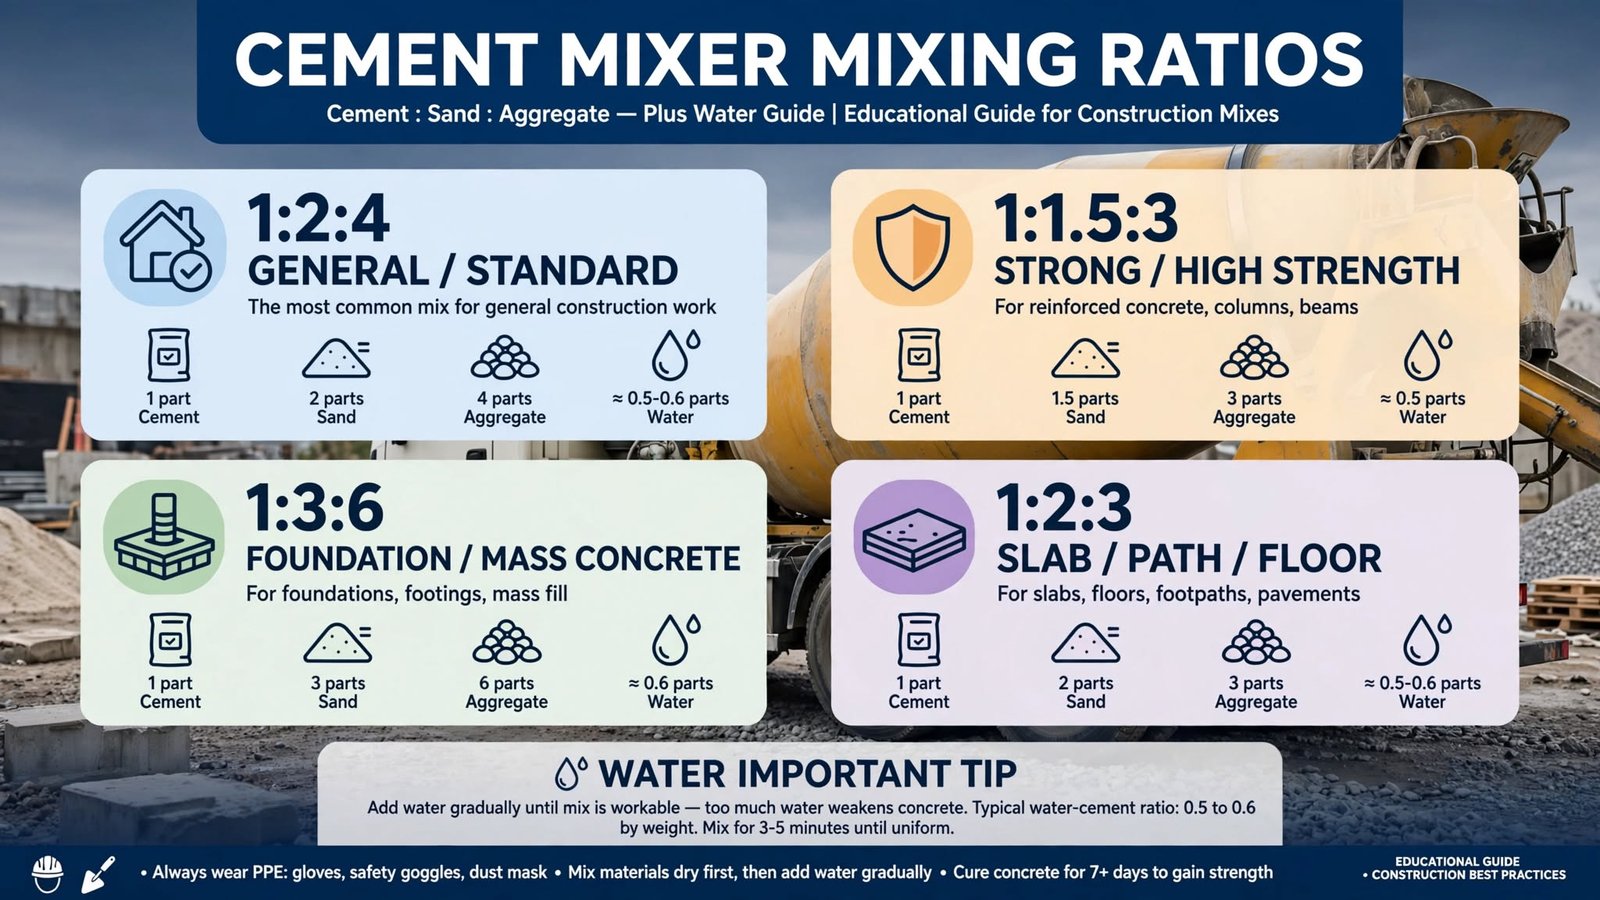
This is the most common recipe. It works for most jobs. Patios. Walkways. Footings. Slabs. The ratio is simple. One part cement. Two parts sand. Three parts gravel.
Use a bucket to measure. One bucket cement. Two buckets sand. Three buckets gravel. Add water slowly. Mix until workable. The mix should hold its shape. It should not crumble. It should not run.
This recipe delivers around 3,000 PSI. That is strong enough for most residential work. It sets in 24 to 48 hours. It cures fully in 28 days. Keep it moist during curing. Dry concrete cracks.
This mix is easy to work with. It flows into forms. It finishes smooth. It handles foot traffic after a few days. It handles vehicles after a month. Use it for most projects. It rarely fails.
Adjust water carefully during Cement Mixer Mixing. Too much water weakens the mix. It drops the PSI. It causes cracks. Add water in small amounts. Stop when the mix looks right. A good mix holds together. It does not ooze.
2 — High Strength Concrete Mix (1:1.5:3)
Some jobs need extra strength. Foundation walls. Structural beams. Heavy load areas. This recipe delivers around 4,000 PSI. It uses less sand and gravel. It uses more cement.
The ratio is one part cement. One and a half parts sand. Three parts gravel. Measure carefully for optimal Cement Mixer Mixing. Small errors matter more in this mix. Precision delivers strength.
This mix is stiffer. It does not flow as easy. It needs more working. It needs faster placement. Have forms ready. Have tools ready. Do not let it sit. Stiff mixes set faster during Cement Mixer Mixing.
✨ Pro Tip: Working with High Strength Mix
Use this mix for structural work. Use it for load-bearing walls. Use it for columns. Use it where strength matters most. It costs more. The cement content is higher. The strength is worth it. Cure this mix carefully to prevent weakness.
Cure this mix carefully. Keep it wet for seven days. Cover it with plastic. Mist it daily. Proper curing builds full strength. Skipping curing weakens the mix. Weak concrete fails.
3 — Mortar Mix (1:3)
Mortar is different from concrete. It has no gravel. It uses cement and sand only. The ratio is one part cement. Three parts sand. Add water to reach a thick, sticky consistency.
Mortar binds bricks. It binds blocks. It binds stone. It fills gaps. It holds walls together. It needs to be workable. It needs to stay in place. It should not run.
For proper Cement Mixer Mixing, mix mortar in small batches. It sets faster than concrete. It dries out quick. Mix only what gets used in thirty minutes. Discard what hardens. Do not add water to revive it. Revived mortar is weak.
Use clean sand. Dirty sand weakens mortar. It causes cracks. It causes bond failures. Washed sand works best. Check for debris. Screen it if needed.
Mortar needs proper consistency. Too wet and it sags. Too dry and it crumbles. The right mix holds a ridge. It spreads smooth. It sticks to the trowel. Practice the Cement Mixer Mixing ratio. Get it right.
4 — Stucco Mix (1:3 with Lime)
Stucco covers walls. It protects surfaces. It looks good. The Cement Mixer Mixing needs flexibility for stucco. It needs to bond. It needs to resist cracking. This recipe uses lime for flexibility.
The ratio is one part cement. Three parts sand. One part lime. Add water to reach a thick paste. Mix until smooth. The lime makes the mix stickier. It makes it more workable.
Stucco goes on in layers. The first layer is thick. It bonds to the wall. The second layer smooths the surface. The third layer finishes it. Each layer needs curing time. Rushing causes cracks.
Keep stucco moist during curing. Dry stucco cracks. Mist it daily for a week. Cover it if needed. Slow curing builds strength. Fast curing causes failure.
Use this mix for exterior walls. Use it for interior walls. Use it for decorative finishes. It handles weather. It handles movement. It lasts for years with proper care.
5 — Concrete for Cold Weather (1:2:3 with Accelerator)
Cold weather changes concrete. It sets slower. It cures slower. It freezes easier. This recipe adds an accelerator. The accelerator speeds setting. It reduces freeze risk.
The ratio stays the same. One part cement. Two parts sand. Three parts gravel. Add the accelerator per the label. Mix it with the water first. Then add to the dry mix.
Use warm water. Not hot. Warm. Around 70 to 80 degrees. Warm water speeds curing. It prevents freezing. Never use hot water. Hot water flash-sets the cement.
Protect the pour after placing. Cover it with insulated blankets. Keep it warm for 48 hours. Do not let it freeze. Frozen concrete is ruined. It crumbles. It fails.
This mix works in temperatures down to 40 degrees. Below that, heated enclosures are needed. Plan ahead. Check the forecast. Do not pour if freezing is coming.
6 — Fast Setting Concrete (1:2:3 with Rapid Set Cement)
Some jobs need speed. Fence posts. Mailbox bases. Quick repairs. This recipe uses rapid set cement. It hardens in minutes. It sets in hours. It is ready for load in a day.
The ratio stays the same. One part rapid set cement. Two parts sand. Three parts gravel. Start Cement Mixer Mixing fast. Place fast. Finish fast. The working time is short. Ten to fifteen minutes. No delays.
Measure everything before starting. Have water ready. Have tools ready. Have forms ready. Once Cement Mixer Mixing starts, there is no stopping. Speed matters. Rushing causes mistakes. Preparation prevents them.
Rapid set concrete generates heat. It gets warm as it cures. This is normal. It speeds curing. It also means the mix sets fast. Do not touch it after placing. Let it harden. It will be solid in minutes.
Use this mix for small jobs. Use it for repairs. Use it where speed matters. It costs more than standard cement. The speed is worth it for the right jobs.
Why Ratios Matter
Wrong Cement Mixer Mixing ratios cause problems. Too much water weakens concrete. It drops the PSI. It causes cracks. It causes dusting. The surface wears away.
Too little water makes concrete unworkable. It crumbles. It does not fill forms. It leaves voids. Voids weaken the structure. They cause failure.
Too much sand makes concrete brittle. It cracks under load. It does not handle freeze-thaw cycles. It fails over time.
Too little cement weakens the mix. The concrete does not bond. It crumbles. It turns to dust. It fails early.
Right Cement Mixer Mixing ratios deliver strength. They deliver durability. They deliver workability. The mix flows. It sets hard. It lasts for decades. Ratios are not suggestions. They are rules.
Measuring Tips
Accurate measuring delivers consistent Cement Mixer Mixing results. Follow these tips.
Use the same container for all measurements. A bucket works well. Mark the levels. Keep it clean.
Measure dry ingredients first. Cement. Sand. Gravel. Mix them dry. Then add water. This blends evenly.
Add water slowly. Stir between additions. Stop when the mix reaches the right consistency. It should hold its shape. It should not ooze.
Do Cement Mixer Mixing for three to five minutes. Proper Cement Mixer Mixing blends everything. It activates the cement. It delivers strength. Undermixed concrete is weak.
Check the mix. Squeeze a handful. It should hold together. It should not crumble. It should not drip water. Adjust if needed.
Common Cement Mixer Mixing Mistakes
Certain mistakes show up again and again. Knowing them helps avoid them.
| Mistake | Result & Fix |
|---|---|
| Guessing at ratios | Eyeballing does not work. Measure every time. |
| Adding too much water | Water makes Cement Mixer Mixing easy but weakens concrete. |
| Cement Mixer Mixing too long | Causes segregation. Mix just enough. |
| Cement Mixer Mixing too little | Leaves dry pockets. Mix the full time. |
Using dirty ingredients. Dirty sand weakens the mix. Dirty gravel causes bond failures. Use clean materials.
Skipping curing. Curing builds strength. Skipping it weakens the concrete. Keep it moist. Let it cure.
Each mistake is easy to fix. Fix them. Get strong concrete. Get durable results.
Final Thoughts
Compact Cement Mixer Mixing ratios guide is simple. Six recipes cover most jobs. General purpose. High strength. Mortar. Stucco. Cold weather. Fast setting.
Each recipe uses specific ratios. Follow them exactly. Measure carefully. Mix properly. Cure correctly. The results speak for themselves.
Strong concrete starts with right ratios. Right ratios start with this guide. Use it. Follow it. Build with confidence. The concrete will last.
